AERO-PMA-PARTS AND AvTek
www.aero-pma-parts.com www.avtek2.com
1800/659-2800 THIS IS THE –02 MANUAL 1800/770-3265
-01 & -02 “Air-Squeeze” Seal Install Manual
Use Masking Tape to temp help hold the –01 or –02 seal in place, allowing you get “FEEL” how/where seal will look.
USE Masking Tape for ONLY a few minutes to help YOU see how the Seal will compress
Then use a marker pen and mark the accurate location on your door, where the seal will be attached.
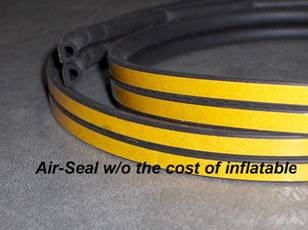
This Manual is included when Purchasing either the –01 & -02 or JUST the –02 Pictured below
PLEASE NOTE: 26 feet is total feet when the twin-chambers are separated. One chamber goes near your hinges, while two or three chambers are installed at the REAR of your Door-where the Gaps are largest. The two Chambers are “Sandwich” together, you can make three wide if/when you need.
Begin at bottom front of Door with the –02 Seal, continue up on the leading- Edge of your door near the hinges. The ONE air-chamber seal goes where the gaps are the smallest, which will be determine by the installer, typically at the hinges. –02 Seal should be installed with DOOR on the aircraft, but the Door MUST 1st be removed to get all the old seal off. Use a heat-gun & putty-knife to remove old seal, then reinstall the door with NO seal at all present and mark where the Gaps are the widest, usually on the rear of the door…This would be a good time to install the –02 Seal, with the door in-place. Then remove door again to install the Black –01 “Squeeze-Out”
(-01 $29.95 Opt-Seal, not included if you did not purchase.)
Follow the instruction in the -01 manual for installing the –01 “Squeeze-Out” Form-Fitting Memory Cell-Seal, that will form a unique door-seal to ONLY your aircraft-door. The Black –02 can be split down the center with razor, in half for 26 total feet. ← Look; you can make THREE air-chambers rows wide where your door gaps need more material. You should need only ONE Chamber up near the Hinges. Relocate that ONE Air- Chamber 4 feet from the area near the hinges to the rear of your Door. Need more –02 seal Call us discount…Need Baggage Door? Just $49
Align the Seal “Air-Chambers” to compress Against Airframe Door-Jam when Door is closed, to achieve an air lock.
Allow 24-48 hours with Door-Closed for all Seals to form-fit.
Read the 2nd Page about using “Masking Tape” & Magic Marker Pen as an aid to help you locate the exact location where on your DOOR the –02 Air-Chambers will go…READ all Instructions before gluing anything.
Install 1 chamber fwd near the hinges. Two Chambers near the hinges will make the door “Bind” when you close it. USE Masking Tape 1st
Remove any & all-old seal first. This is the -02↓Need Baggage Door? Just $49
Align the Seal “Air-Chambers” to compress Against Airframe Door-Jam when Door is closed, to achieve an air lock.
Allow 24-48 hours with Door-Closed for all Seals to form-fit.
Remove any & all-old seal first. This is the -02↓ install fwd near the hinges.
Clean all surface with MEK prior to Appling seal. Take care not to contaminate the stick-side;
Otherwise the Seal will delaminate in time.
Install the –01 “Squeeze-Out” on the rear and bottom of door where the Gaps are the largest.
Please see –01 Squeeze-Out Manual included for details.
The –01 Seal “Butts up-with the –02, not over lay’s on top of each other. ← Look
Please see –01 Squeeze-Out Manual included for details.
![]() Michael J. Peter
Michael J. Peter
Oct 4, 2005
Mr. Mike Peter
Avtek
25230 45th Ave S
Kent, WA 98032
Dear Mr. Peter:
FEDERAL AVIATION ADMINISTRATION - PARTS MANUFACTURER APPROVAL
In accordance with the provisions of Title 14 of the Code of Federal Regulations (CFRs) part 21,
Subpart K, we have found that the design data, submitted by Avtek based on Test & Computations, and
application letter dated April 19, 2005, meet the airworthiness requirements of the regulations applicable
to the products on which the parts are to be installed. Additionally, it has been determined that Avtek has
established the fabrication inspection system required by part 21 § 21.303(h)
at 25230 45th Ave S Kent, WA 98032. Accordingly, Parts Manufacturer Approval (PMA)
is hereby granted for production of the replacement parts listed in the enclosed Supplement No. 3.
FEDERAL AVIATION ADMINISTRATION - PARTS MANUFACTURER APPROVAL